
Zero-Shot Image Segmentation using Segment Anything Model (SAM)

Zero-shot image segmentation, the ability to segment objects in an image without prior training on those specific objects, has become an exciting new frontier in computer vision. The recently released Segment Anything Model (SAM) from Anthropic has emerged as a powerful tool for tackling this challenge.
This article provides a comprehensive guide on leveraging SAM for zero-shot image segmentation. We’ll start by introducing the fundamentals of image segmentation and why zero-shot capabilities are so valuable. Then, we’ll walk through setting up the necessary working environment and dependencies to use SAM.
The core of the article focuses on generating segmentation masks using SAM, exploring both full-image and single-point inference modes. We’ll discuss techniques for faster inference and optimizing performance, enabling you to efficiently apply SAM in your own projects.
This tutorial will benefit a wide audience, from machine learning practitioners exploring the latest advancements in computer vision to developers looking to incorporate state-of-the-art segmentation into their applications. By the end, you’ll have the knowledge and hands-on experience to harness the power of SAM for your zero-shot image segmentation needs.
Table of Contents:
Introduction to Image Segmentation
Setting up the Working Environment
Mask Generation with SAM
Faster Inference: Infer an Image and a Single Point
My New E-Book: LLM Roadmap from Beginner to Advanced Level

I am pleased to announce that I have published my new ebook LLM Roadmap from Beginner to Advanced Level. This ebook will provide all the resources you need to start your journey towards mastering LLMs.
1. Introduction to Image Segmentation
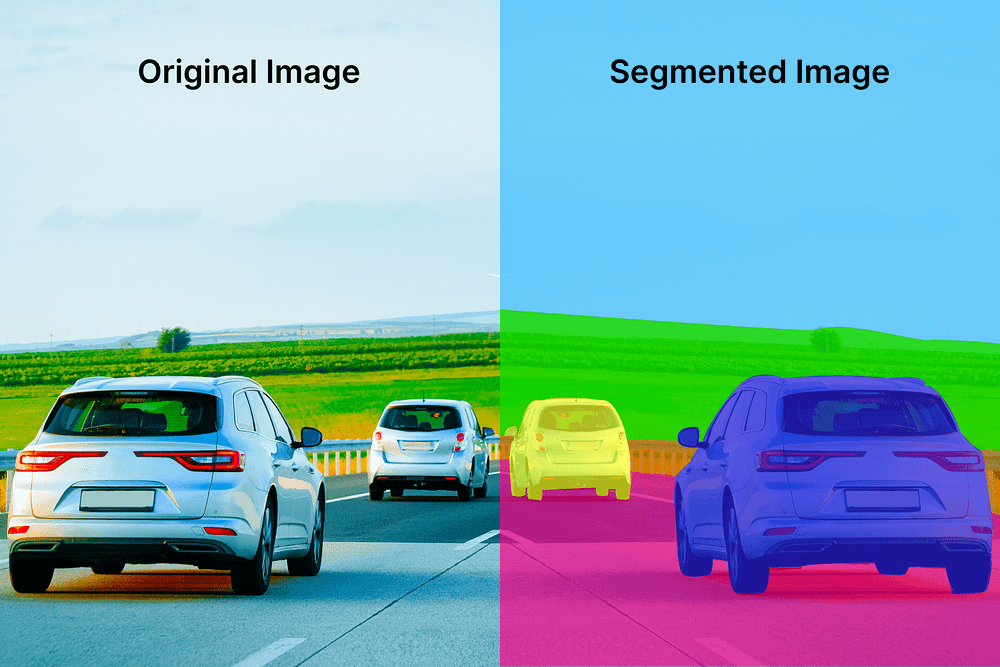
Image segmentation is a process in digital image processing and computer vision that involves dividing an image into multiple segments, regions, or objects. It is used to simplify and change the representation of an image to make it easier to analyze and extract features from.
Image segmentation is often used to locate objects and boundaries in images. It can be applied to a single image or a stack of images, as is common in medical imaging. The output of image segmentation is a set of segments that collectively cover the entire image or a set of contours that can be used to create 3D reconstructions.
Image segmentation has a wide range of applications, including:
Medical imaging (e.g. cancer cell segmentation)
Self-driving systems (e.g. lane segmentation and pedestrian identification)
Satellite imaging and remote sensing
Content-based image retrieval
Fingerprint recognition
Video object co-segmentation and action localization
There are two main classes of segmentation techniques: classical computer vision approaches and groups of image segmentation. The latter includes:
Semantic segmentation: assigning each pixel a class label
Instance segmentation: identifying the specific instance of the object that each pixel belongs to
Panoptic segmentation: a combination of semantic and instance segmentation
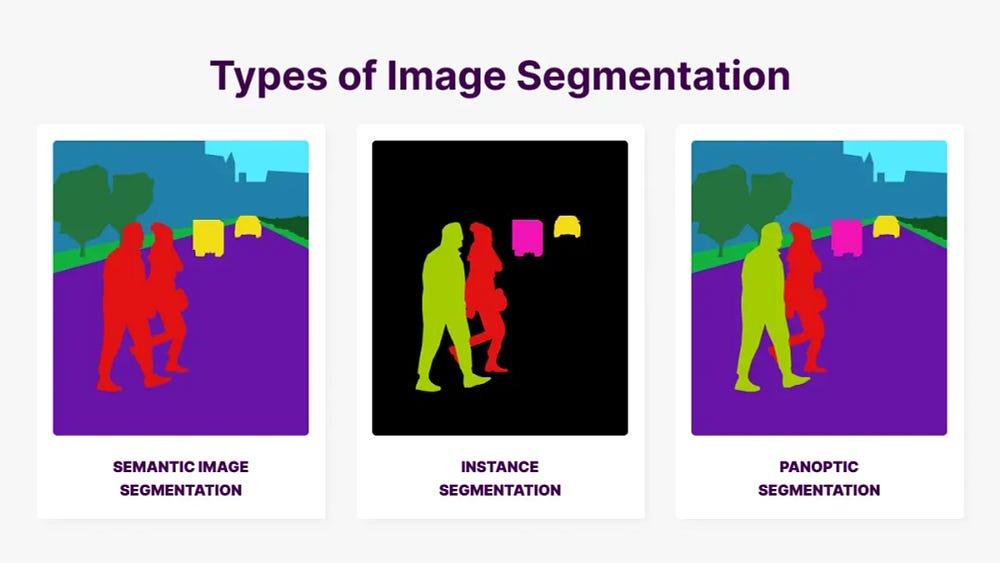
Image segmentation can be performed using various techniques, including:
Edge-based segmentation: identifying the edges of objects in an image
Threshold-based segmentation: dividing pixels based on their intensity relative to a given threshold
Region-based segmentation: dividing an image into regions with similar characteristics
Cluster-based segmentation: using clustering algorithms to identify hidden information in images
Watershed segmentation: treating images like topographic maps and dividing them into regions based on pixel brightness
2. Setting up the Working Environment
Let’s start by setting up the working environments. First, we will download the packages we will use in this article. We will download the Transformers package, the torch package to use Pytorch, and Gardio for demo deployment of the application.
    !pip install transformers
    !pip install gradio
    !pip install timm
    !pip install torchvision
Next, we will define helper functions that we will use throughout this article to plot the boxes on the segmented parts of the images.
import numpy as np
import torch
import matplotlib.pyplot as plt

def show_mask(mask, ax, random_color=False):
    if random_color:
        color = np.concatenate([np.random.random(3),
                                np.array([0.6])],
                               axis=0)
    else:
        color = np.array([30/255, 144/255, 255/255, 0.6])
    h, w = mask.shape[-2:]
    mask_image = mask.reshape(h, w, 1) * color.reshape(1, 1, -1)
    ax.imshow(mask_image)


def show_box(box, ax):
    x0, y0 = box[0], box[1]
    w, h = box[2] - box[0], box[3] - box[1]
    ax.add_patch(plt.Rectangle((x0, y0),
                               w,
                               h, edgecolor='green',
                               facecolor=(0,0,0,0),
                               lw=2))

def show_boxes_on_image(raw_image, boxes):
    plt.figure(figsize=(10,10))
    plt.imshow(raw_image)
    for box in boxes:
      show_box(box, plt.gca())
    plt.axis('on')
    plt.show()

def show_points_on_image(raw_image, input_points, input_labels=None):
    plt.figure(figsize=(10,10))
    plt.imshow(raw_image)
    input_points = np.array(input_points)
    if input_labels is None:
      labels = np.ones_like(input_points[:, 0])
    else:
      labels = np.array(input_labels)
    show_points(input_points, labels, plt.gca())
    plt.axis('on')
    plt.show()

def show_points_and_boxes_on_image(raw_image,
                                   boxes,
                                   input_points,
                                   input_labels=None):
    plt.figure(figsize=(10,10))
    plt.imshow(raw_image)
    input_points = np.array(input_points)
    if input_labels is None:
      labels = np.ones_like(input_points[:, 0])
    else:
      labels = np.array(input_labels)
    show_points(input_points, labels, plt.gca())
    for box in boxes:
      show_box(box, plt.gca())
    plt.axis('on')
    plt.show()


def show_points(coords, labels, ax, marker_size=375):
    pos_points = coords[labels==1]
    neg_points = coords[labels==0]
    ax.scatter(pos_points[:, 0],
               pos_points[:, 1],
               color='green',
               marker='*',
               s=marker_size,
               edgecolor='white',
               linewidth=1.25)
    ax.scatter(neg_points[:, 0],
               neg_points[:, 1],
               color='red',
               marker='*',
               s=marker_size,
               edgecolor='white',
               linewidth=1.25)


def fig2img(fig):
    """Convert a Matplotlib figure to a PIL Image and return it"""
    import io
    buf = io.BytesIO()
    fig.savefig(buf)
    buf.seek(0)
    img = Image.open(buf)
    return img


def show_mask_on_image(raw_image, mask, return_image=False):
    if not isinstance(mask, torch.Tensor):
      mask = torch.Tensor(mask)

    if len(mask.shape) == 4:
      mask = mask.squeeze()

    fig, axes = plt.subplots(1, 1, figsize=(15, 15))

    mask = mask.cpu().detach()
    axes.imshow(np.array(raw_image))
    show_mask(mask, axes)
    axes.axis("off")
    plt.show()

    if return_image:
      fig = plt.gcf()
      return fig2img(fig)


def show_pipe_masks_on_image(raw_image, outputs):
  plt.imshow(np.array(raw_image))
  ax = plt.gca()
  for mask in outputs["masks"]:
      show_mask(mask, ax=ax, random_color=True)
  plt.axis("off")
  plt.show()
Now we are ready to segment the images and create an image mask using the SAM model.
3. Mask Generation with SAM
The Segment Anything Model (SAM) is an image segmentation model developed by Meta AI. It can identify the precise location of either specific objects or every object in an image. SAM was released in April 2023 and is open source under the Apache 2.0 license.
Keep reading with a 7-day free trial
Subscribe to To Data & Beyond to keep reading this post and get 7 days of free access to the full post archives.