
Building your first Docker container for Machine Learning Applications

One of the major operational challenges I faced when starting my career as a Data scientist was the dependency-conflict issue. Back in the college, a simple pip install was usually enough to get your code running without a hitch.
Aside from a few group projects, it was a one-man show. I was the developer, the only server (my trusty laptop), and the sole user. It was a perfectly balanced ecosystem that vanished the moment I stepped out into the real world.
The simple pip install would now turn into a regular nightmare called dependency conflict-one project needs this, while another needed that. Every update or fresh deployment was another gamble that threatened to break the existing setup and required me to invest a lot of time manually reconfiguring the environments.
A trivial solution was to build a separate environment—using conda or venv—for each project. But every time we migrated to a new server, I had to redo the tedious work of recreating each environment from scratch.
Remember the quote “Work Smart not hard”? This was the reason I began learning Docker and CI/CD for machine learning.
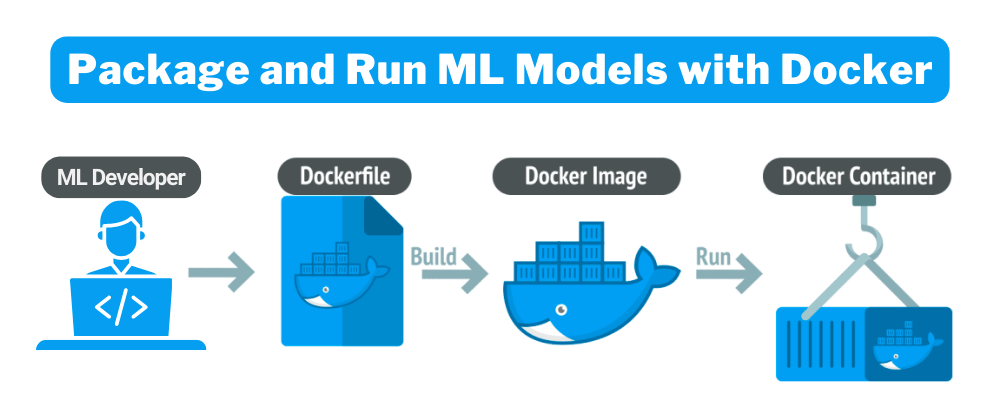
Table of Contents:
What is Docker
How to install Docker
Hands-on application
My New E-Book: Efficient Python for Data Scientists

I am happy to announce publishing my new E-book Efficient Python for Data Scientists. Efficient Python for Data Scientists is your practical companion to mastering the art of writing clean, optimized, and high-performing Python code for data science. In this book, you'll explore actionable insights and strategies to transform your Python workflows, streamline data analysis, and maximize the potential of libraries like Pandas.
1. What is Docker
Docker is simply an open-source tool that enables developers to automate the tedious deployment process mentioned before by introducing the concept of containerization.
In the docker world, we have three concepts:
Image
Container
DockerFile
A good analogy for containers and images is to think of them as your PC/Laptop and the installed OS, where docker image is a mini OS that contains everything your application needs to run, the container is the dedicated pc -or environment- that you create to run your application, and the DockerFile is the text file containing the instructions to build the container.

We will deep dive deeper into the details of creating the DockerFile for our ML application.
2. How to install Docker
For Windows: https://docs.docker.com/desktop/setup/install/windows-install/
For Linux: https://docs.docker.com/desktop/setup/install/linux/
For MacOS: https://docs.docker.com/desktop/setup/install/mac-install/
For this article, we will follow along using the Docker Desktop version.
3. Hands-on application
In this tutorial, we will create a train.py where we generate dummy training data and save the fitted model to be used for inference in a Flask API.
Here is the code for the train.py
import numpy as np
import joblib
from sklearn.linear_model import LinearRegression
# Generate dummy data
X = np.array([[1], [2], [3], [4], [5]])
y = np.array([2, 4, 6, 8, 10])
# Train model
model = LinearRegression()
model.fit(X, y)
# Save model
joblib.dump(model, 'model.pkl')
print("Model saved!")
And this will be our Flask application code
from flask import Flask, request, jsonify
import joblib
import numpy as np
import logging
# Initialize Flask App
app = Flask(__name__)
# Configure Logging
logging.basicConfig(level=logging.INFO, format="%(asctime)s - %(levelname)s - %(message)s")
# Load Model
MODEL_PATH = "model.pkl"
try:
    model = joblib.load(MODEL_PATH)
    logging.info(f"✅ Model loaded successfully from {MODEL_PATH}")
except Exception as e:
    logging.error(f"❌ Error loading model: {e}")
    model = None

@app.route("/", methods=["GET"])
def home():
    """Root endpoint - API Welcome Message."""
    return jsonify({
        "message": "🚀 Welcome to the ML Prediction API!",
        "endpoints": {
            "Predict": "/predict (POST)"
        }
    })

@app.route("/predict", methods=["POST"])
def predict():
    """Endpoint to make predictions using the trained model."""
    if model is None:
        logging.error("Prediction request failed: Model not loaded.")
        return jsonify({"error": "Model not loaded"}), 500
    try:
        # Get JSON data from request
        data = request.json.get("input")
        if not data:
            logging.warning("Prediction request failed: Missing 'input' data.")
            return jsonify({"error": "Missing 'input' data"}), 400
        # Convert input to NumPy array and make prediction
        prediction = model.predict(np.array(data).reshape(-1, 1))
        logging.info(f"Prediction successful: {prediction.tolist()}")
        return jsonify({"prediction": prediction.tolist()})
    except Exception as e:
        logging.error(f"Prediction error: {e}")
        return jsonify({"error": "Invalid input format"}), 400

if __name__ == "__main__":
    app.run(host="0.0.0.0", port=5000, debug=True)
The app.py is to have two main routes
/home: Just a simple welcome page./predict: Endpoint that we will use for inference.
For this simple project here are our requirements.txt
flask~=3.1.0
pandas
numpy~=2.2.2
joblib~=1.4.2
scikit-learn~=1.6.1
Our DockerFile will be something like this
# Use the official Python 3.12 image as base
FROM python:3.12

# Set the working directory inside the container
WORKDIR /app

# Copy the current project directory into the container
COPY . /app

# Install dependencies
RUN pip install -r requirements.txt

# Expose the Flask port
EXPOSE 5000

# Run the application
CMD ["python", "app.py"]
In this file, we imported our desired base image with the selected Python version. Then, we copied all the required application files from our project directory to our container, we installed all the required packages, exposed the port on which the API would run, and finally defined the main command to run the application.
Now before running any docker command, we have to make sure that we have started the docker engine, in our case we have to launch the Docker Desktop Application.

Having done that, we will now use our first command to build the image.
docker build -t ml-app .By running the previous command we see a step-by-step execution for each command we have written in our DockerFile.

By now we have finished building our first docker container for our ML application.
to run the container we will use this command
docker run -p 5000:5000 ml-appThis command could be generalized as
docker run -p <HOST_PORT>:<CONTAINER_PORT> <IMAGE_NAME>where HOST_PORT is the port that we will use from the host machine — your pc/laptop in this case-, CONTAINER_PORT is the port running from inside the docker container, and the IMAGE_NAME is the name of the docker image we have just created.
When you run this command the output will be something like this

172.17.0.2:5000 is the internal IP address of the Docker container (Not accessible from your host machine).
127.0.0.1:5000 is localhost.
To get insight about running containers use this command
docker ps
The output of the previous command shows a detailed list of all the currently running containers.
We can test the API on Postman but for this example, we will use curl on the Windows cmd like this
curl http://localhost:5000/
to test the model prediction we will use this command
curl -X POST http://localhost:5000/predict -H "Content-Type: application/json" -d "{\"input\": [6, 7, 8]}"in this command, we passed the array [6,7,8] as an input for the linear regression model.

You can stop the running container using this command
docker stop <container_id>where <container_id> in this case is 7e2a8b2296d4
Additional Resources
Take a look at these very useful resources
 |
|